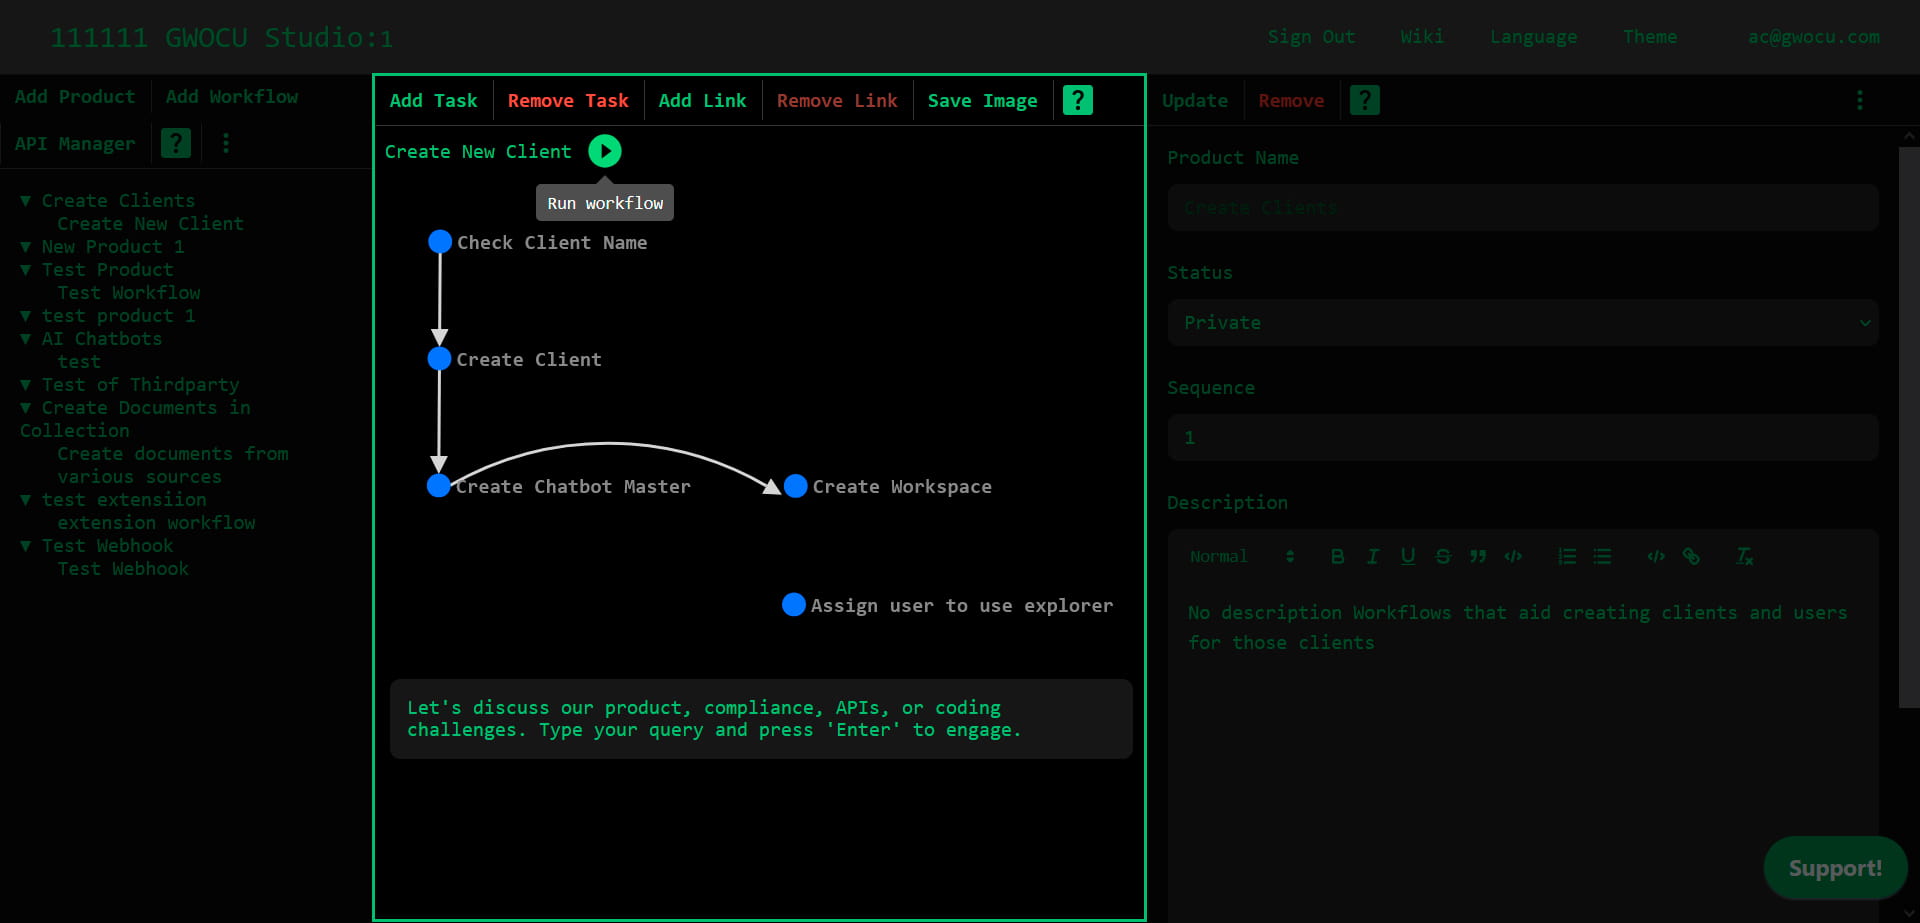
¶ Workflow Graph Panel
The Workflow graph panel allows you to visualize and interact with your workflows in a graphical format. After creating a workflow within a product, you can select it to view it in the panel.
Readers can visualize and execute the workflows, whereas owners and designers can also modify them by adding, linking, and removing tasks (nodes), as long as the sequence does not create loops or reverse the flow. Additionally, owners and designers can include descriptions to both tasks and links for better context.
¶ Adding Tasks to Workflow
To add tasks to the workflow graph:
- Select the workflow to which you want to add tasks.
- Click the "Add Task" button on the panel toolbar. A new task (node) with a unique, automatically generated identifier will appear on the diagram.
¶ Viewing Task Details
To view the details of a task in the workflow:
- Select the workflow containing the task you wish to view.
- Click the task in the graph. The task description will display in the rightmost panel.
- (Optional) Click the context menu in the top-right corner of this panel and choose an option to run the task, view its description or compliance information, or see the code used to execute it in the workflow.
¶ Editing Task Details
You can change a task's position in the diagram by clicking on it and dragging it around.
To change a task's details or compliance information:
- Click the task in the graph. If the task doesn’t implement an API, its details view opens in the right panel, where you can view and edit its settings. If the task implements an API, the cURL execution view opens instead. To view task details, select Description from the right panel menu.
- (Optional) To change the task's compliance information, click the context menu in the top-right corner and choose the "Compliance" option.
- Edit the information as needed.
- Click the "Update" button on the panel's toolbar to save your changes.
¶ Removing Tasks from Workflow
Removing a task deletes all associated data, including links that connect to it and any data related to those links. To remove a task:
- Click on the task in the diagram.
- Click the "Remove Task" button in the panel's toolbar.
¶ Adding Links Between Tasks
You can link two tasks as long as you avoid creating loops or reverse the flow in your workflow. To create a link between two tasks:
- Select the workflow that contains the tasks you want to connect. Ensure there are at least 2 tasks in the workflow.
- Click the "Add Link" button on the panel's toolbar. A modal dialog will appear.
- Edit the information as needed.
- Select the link type you wish to use to customize its appearance in the diagram.
- Click the "Save" button. The modal dialog will close, and the link will be displayed in the diagram.
¶ Editing Link Details
To change the tasks that a link connects, you must delete the existing link and create a new one. To modify any other link detail:
- Click on the link in the diagram. The link details view will appear in the rightmost panel.
- Edit the information as needed.
- Click the "Update" button on the panel's toolbar to save your changes.
¶ Removing Links from A Workflow
Removing a link deletes all data associated with it. To remove a link:
- Click on the link in the diagram.
- Click the "Remove Link" button in the panel's toolbar.
¶ Saving Workflow Graph as Image
To save a workflow as an image:
- Select the workflow you want to save.
- Click the "Save as Image" button on the panel's toolbar. A prompt will appear asking for the image format.
- Type the image format: "svg" or "png".
- Click the "Ok" button. The image will be downloaded directly to your device for future use.
¶ Running Workflows
To run a workflow, make sure it has at least one API task connected to another task and then click the "Run Workflow" button next to the workflow name. Its workflow execution terminal view will open in the right panel. Use the following commands in the terminal to control execution:
run: starts or restarts the workflow by executing the first task.next: executes the next task in a workflow, but only after the workflow has started.stop: aborts the workflow execution once it has started.clear: clears the terminal interface.
The API response will be displayed as a JSON object containing both the status and the response body. You can hover over a parameter or its value to reveal the Copy to clipboard button.