¶ Table of Contents
- Workflows
- Create Products (Optional)
- Create Workflows
- Set Up a Workflow
- Add Tasks to a Workflow
- Configure Tasks in a Workflow
- Links
- Control Task Order of Execution
- Execute Single API Tasks
- Run Workflows
- Webhooks
- Clone Workflows
- Copying Workflows into Other Workspaces
- Export Workflow Graph as Image
- Change Workflow Visibility
- Generate Code Implementations
- Removing Workflows
¶ Workflows
Use a workflow to call a series of APIs you've registered, visualize the sequence as a diagram, and test and document how they work together. A workflow helps you showcase your product's capabilities and demonstrate how its APIs integrate to solve a specific use case.
Each workflow represents a product use case, so to create a workflow, you must choose the product it belongs to. If you don't have a product, create one first.
¶ Create Products (Optional)
To create a product:
- Go to the home page.
- Click the Add Product toolbar button in the tree panel. A modal like this will appear:
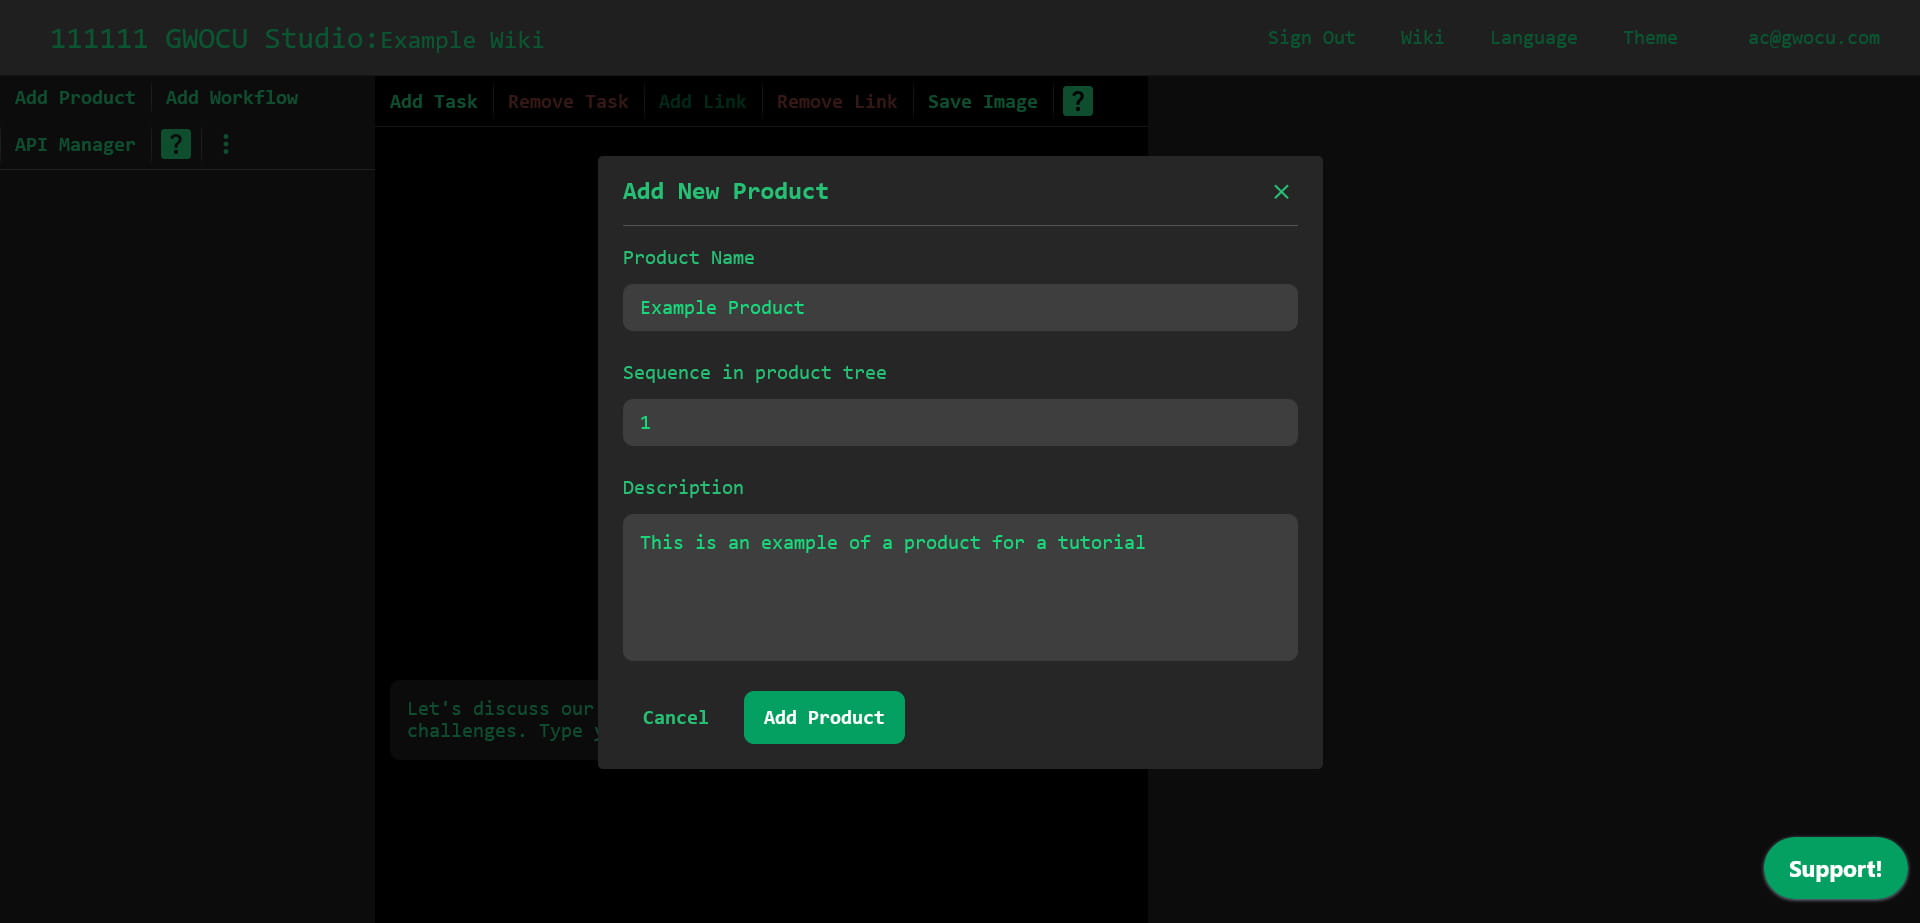
- Fill out these fields:
- Product Name: must be unique and can't be modified later.
- Sequence in product tree: determines the order in which the products appear in the tree panel. If multiple products have the same number, they're listed in the order they were created.
- Description: briefly describes the product. You can edit it later from the product details panel using markdown or rich text.
- Click the Add Product button to save your changes. The new product will appear at the specified sequence in the tree panel.
¶ Create Workflows
Once you have a destination product, you can create a workflow in it following these steps:
- Go to the home page.
- Click the Add Workflow toolbar button in the tree panel. A modal like this will appear:
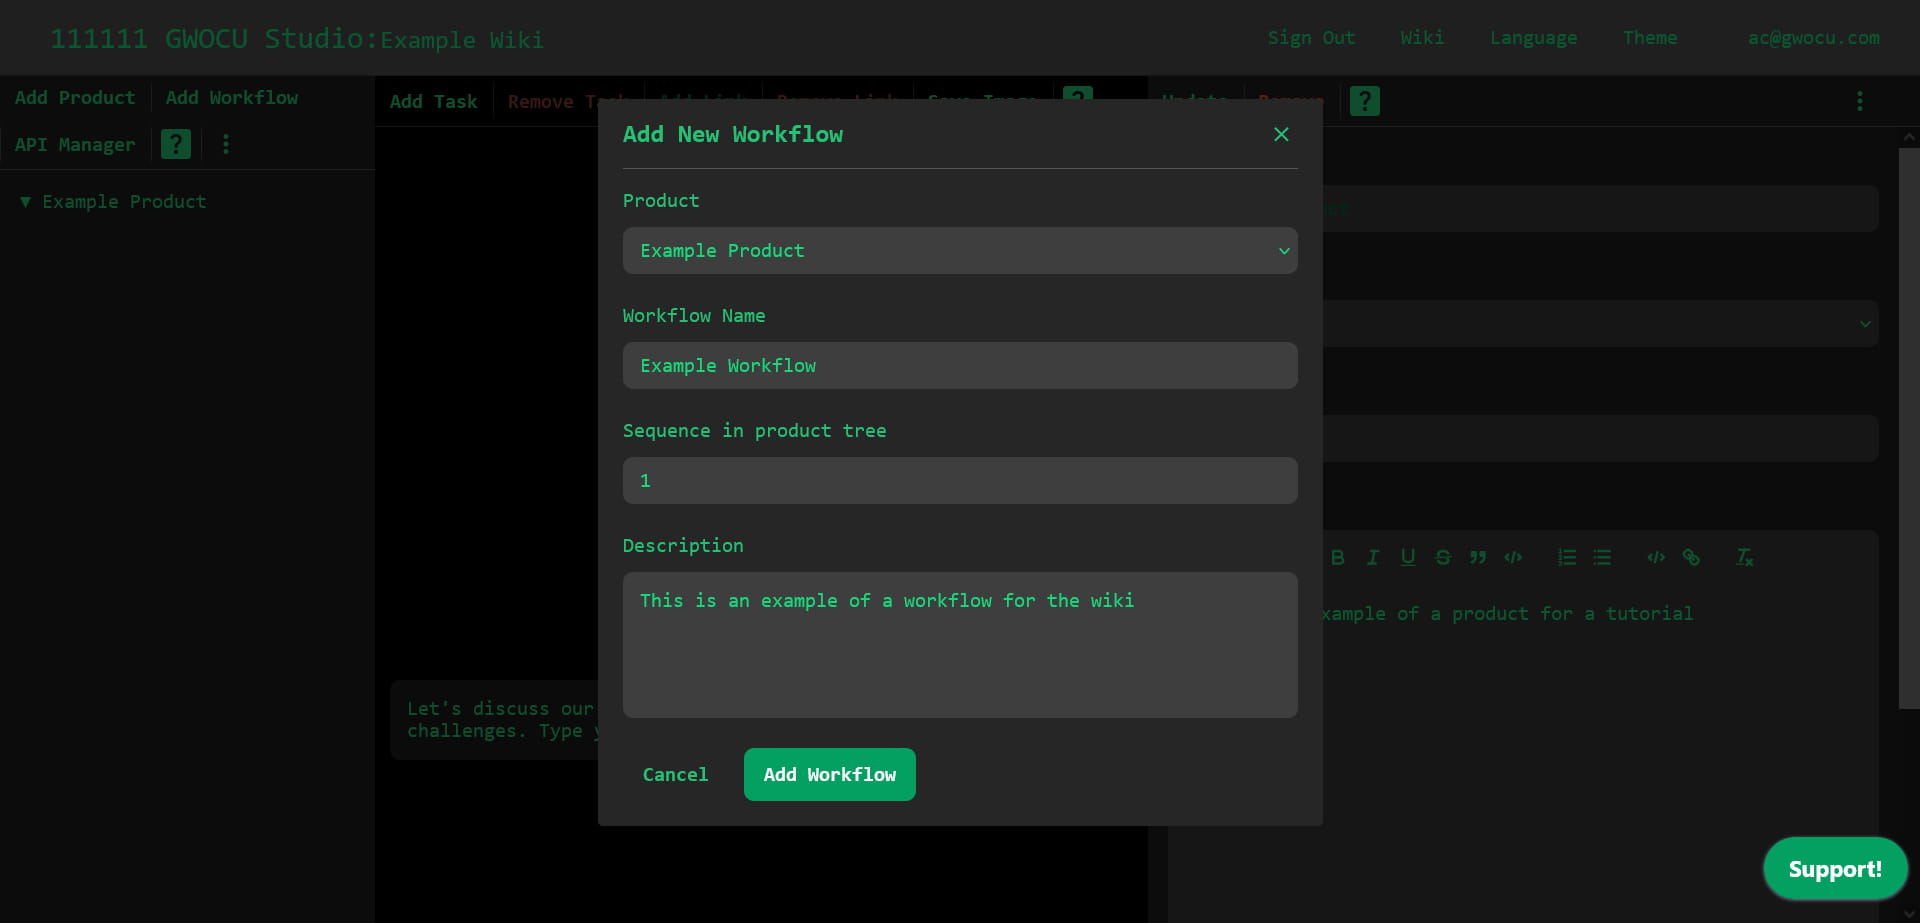
- Fill out these fields:
- Product: select the product to which the workflow belongs.
- Workflow Name: must be unique and can not be modified later. You can clone a workflow to give it a new name while retaining all data and configurations.
- Sequence in product tree: determines the order in which the workflows appear under the selected product in the tree panel. If multiple workflows share the same number, they're listed in the order they were created.
- Description: briefly describes the workflow. You can edit this later using markdown or rich text in the workflow details panel.
- Click the Add Workflow button to save your changes. The new workflow will appear under the specified product in the tree panel at the selected position.
¶ Set Up a Workflow
A workflow consists of tasks and links:
- Tasks: Use tasks to make API calls or include additional steps a user must take to complete a use case. They are visually represented as nodes in the workflow diagram.
- Links: Use links to define the execution order of tasks or pass data from one API's response to another API's request. They are visually represented as arrows in the workflow diagram.
Workflow tasks can be arranged in various sequences as long as they flow in one direction, without forming loops or going backward.
Below are examples of valid task sequences:

Below are examples of invalid task sequences:

¶ Add Tasks to a Workflow
To add a task to a workflow
- Select the workflow by clicking its name in the tree panel or on its graph diagram in the middle panel.
- Click the Add task toolbar button.
The new task will appear as a green node in the diagram.
¶ Configure Tasks in a Workflow
Tasks in a workflow can be configured based on the role they play:
- API tasks call the APIs set up in the API Manager. They appear as blue nodes in the workflow graph.
- Non-API tasks represent complementary steps, such as opening a web page, interacting with a device, or sending an email. They appear as green nodes in the workflow graph.
Tasks are also classified as compliance or normal:
- Compliance tasks require adherence to legal regulations due to their payload, usage, or integration. Their nodes have red borders in the workflow graph.
- Normal tasks don't have legal compliance requirements.

By default, tasks are normal and non-API. You can configure them to change their role in the workflow through the Task Details View in the right panel.
¶ Access the Task Details View
For non-API tasks: Click the task's node to select it and open the view. If the task is already selected but another view is open, use the panel menu and select Description.
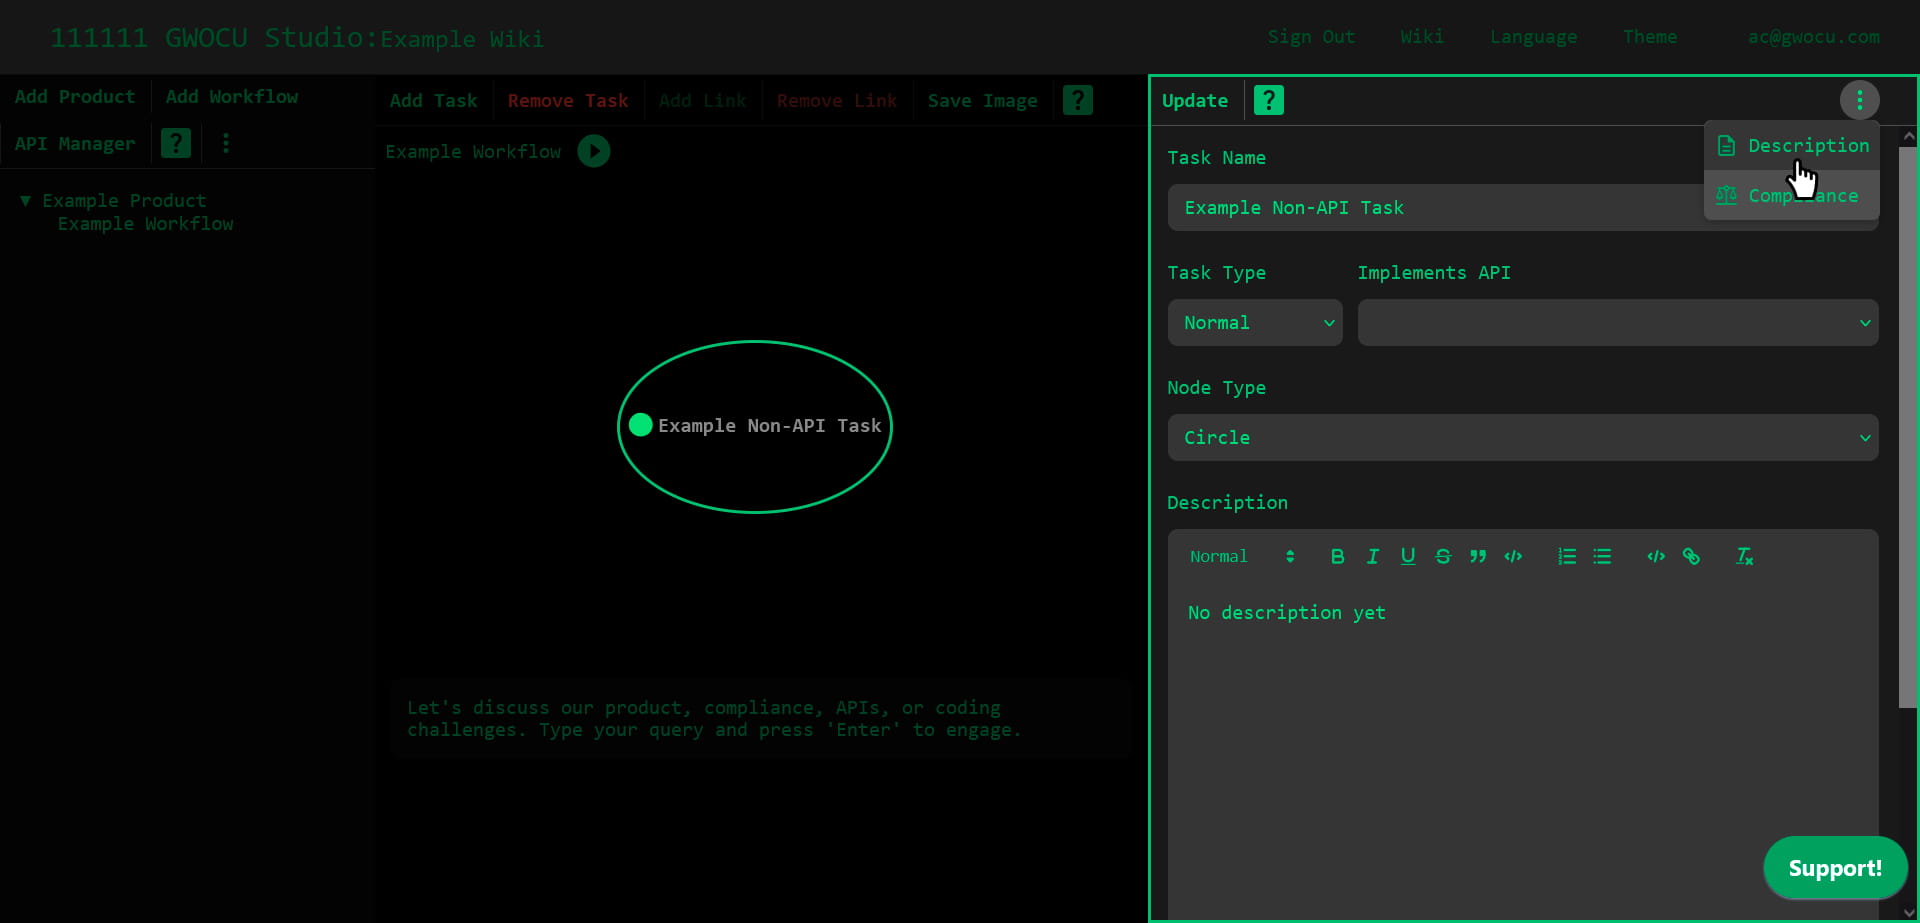
- For API tasks: Click the task's node to select it. Then, open the panel menu and select Description.

Here you can configure:
- Task Name: label displayed on the corresponding node in the workflow graph.
- Task Type: choose between normal or compliance.
- Implements API: Select an API from the list to configure the task as an API task. Leave this field empty to configure it as a non-API task.
- Node Type: determines the shape of the node in the graph. Nodes are circular by default, with other available shapes: cross, diamond, square, star, triangle, and wye.

- Description: provide a brief explanation of the task's role in the workflow. Supports markdown or rich text formatting.
¶ Links
Use links to connect pairs of tasks and define the order of execution in a workflow. Links can also pass data from an API response to another API's request.
¶ Connect Tasks
To connect two tasks in a workflow:
- Click the Add Link toolbar button in the middle panel of the home page. A modal like this will appear:
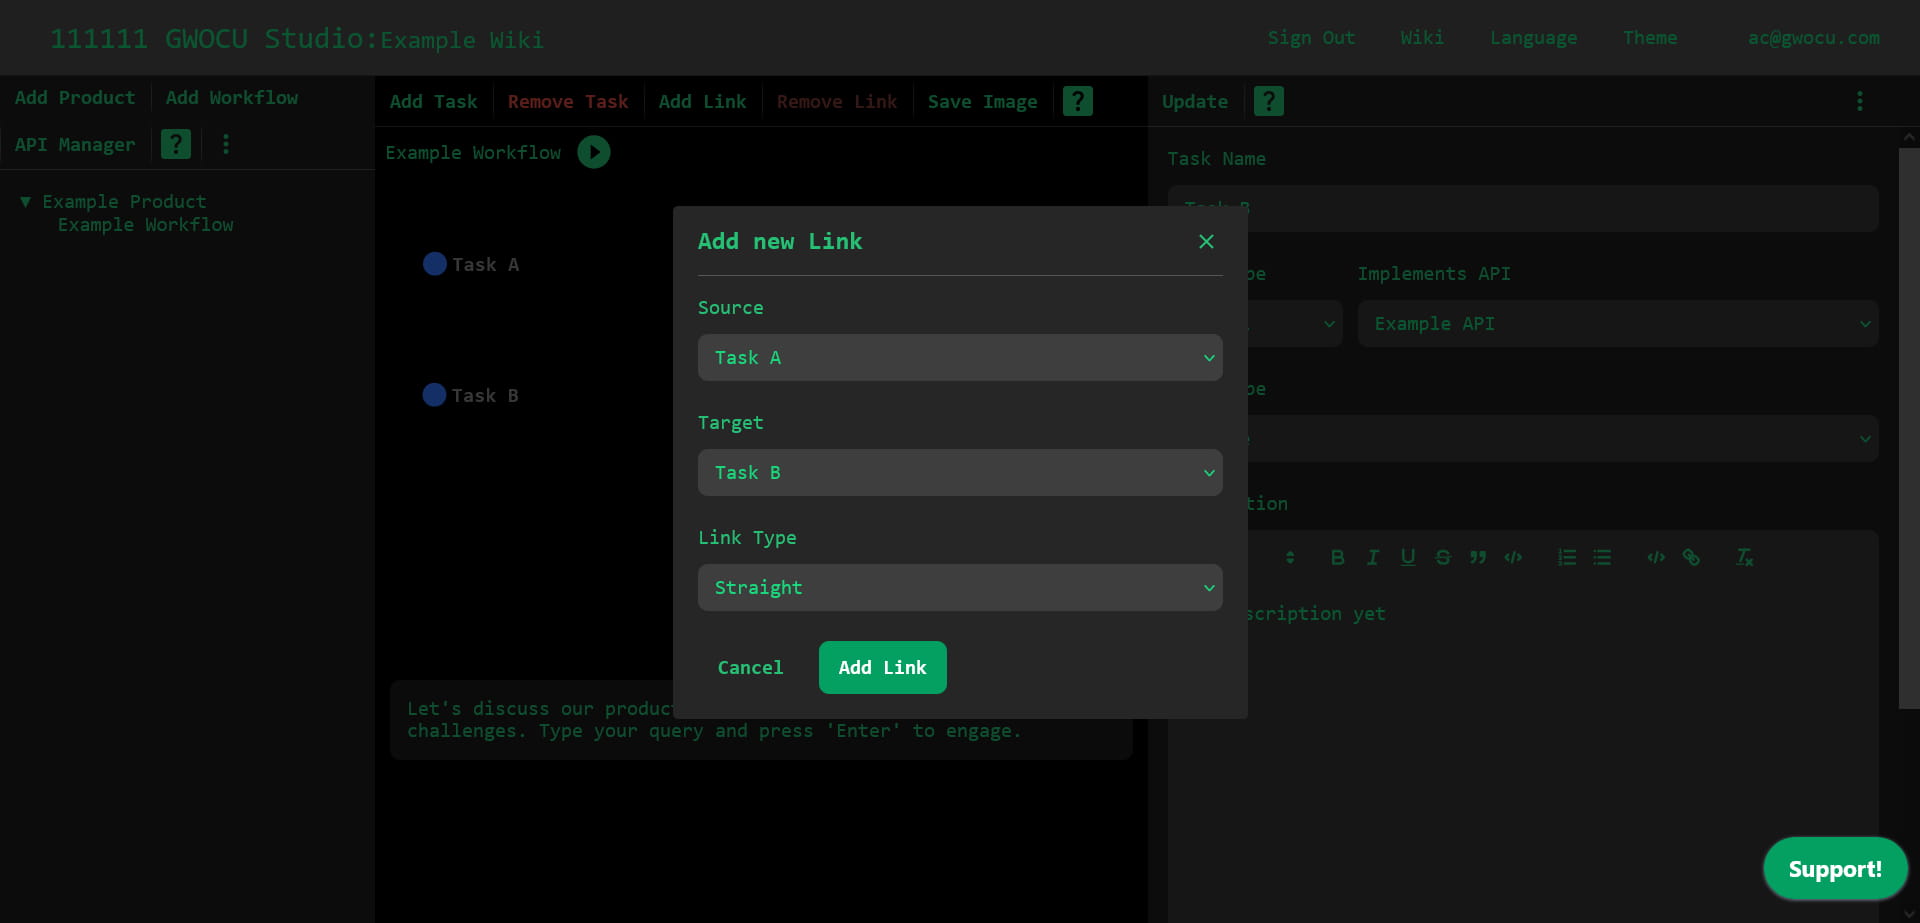
- Select the source task (where the link begins) and the target task (where the link ends). If you want to change them later, you'll need to delete the link and create a new one.
- Select a link type to determine how curved the link line will be in the diagram. The options are: Straight, Smooth Curve and Full Curve.

- Click the Add Link button to create the link. An arrow will appear in the diagram, pointing from the source task to the target task.
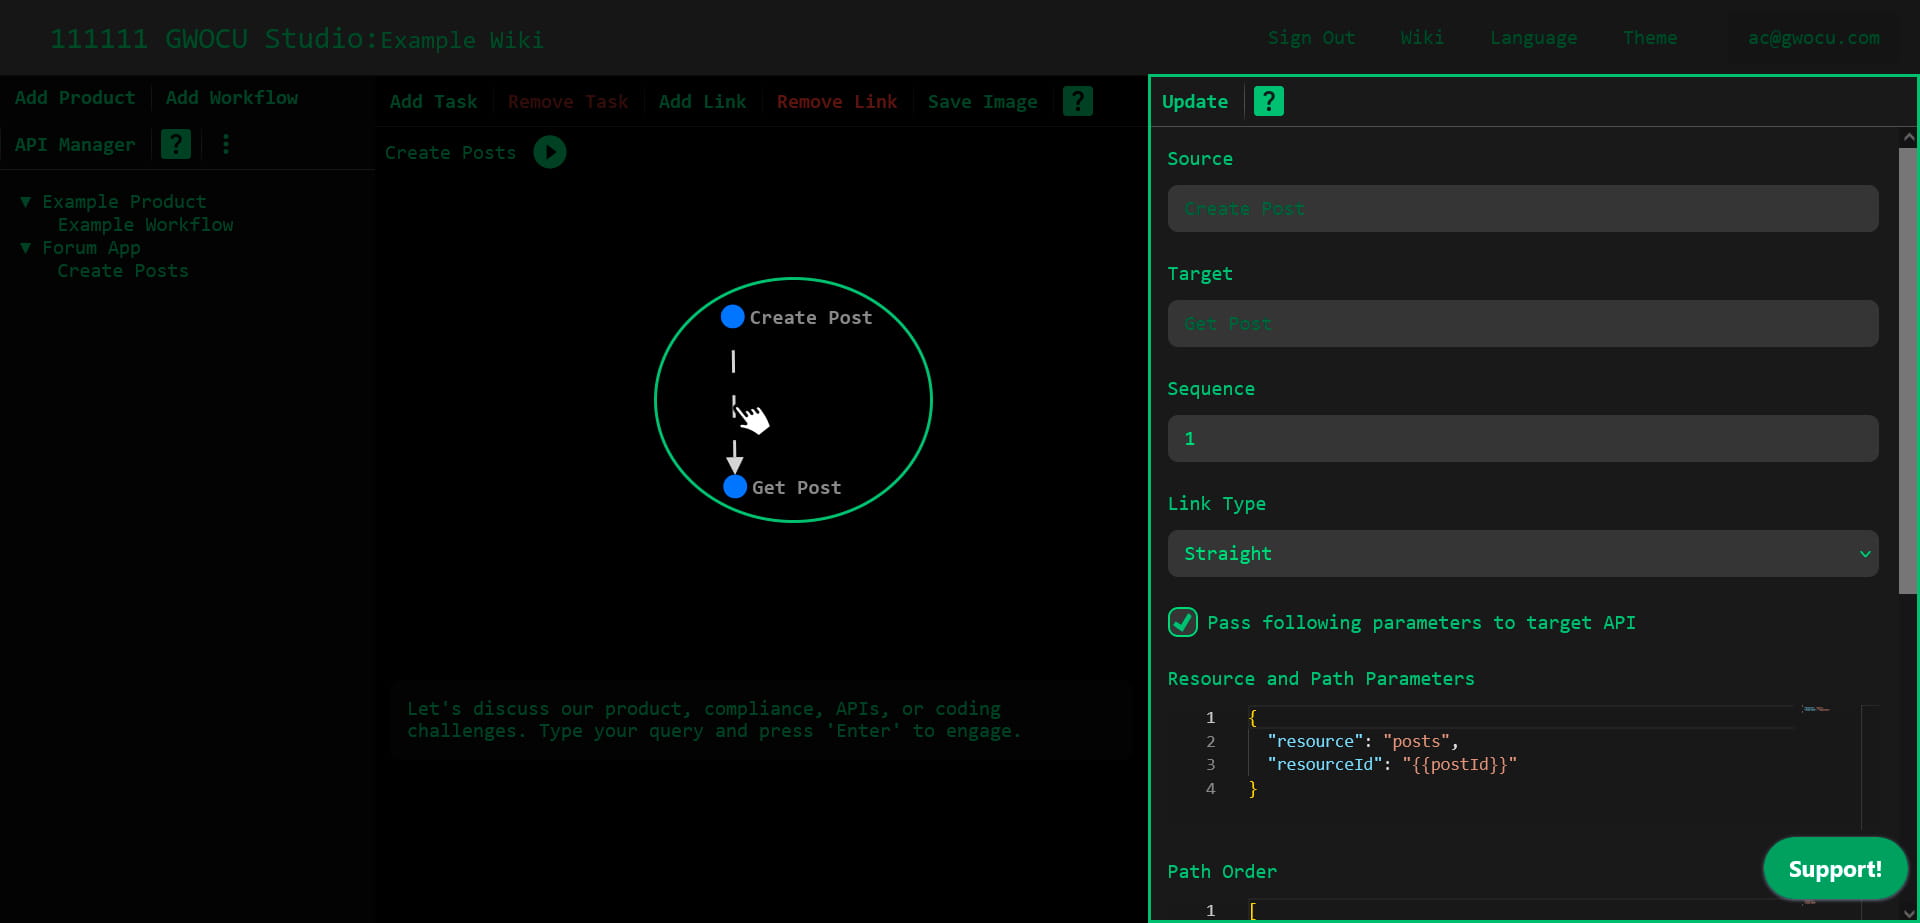
¶ Pass Data Between API Tasks
You can configure the link between two API tasks to use data returned by the source task in the payload of the target task.
Currently, you can't pass data between tasks that aren't directly connected by a link. As a workaround, you may need to create an auxiliary link.
To pass data between two API tasks:
- Click on their link to show their details in the right panel.
- Check the Pass following parameters to target API box. This will use the payload parameters you set below to overwrite the request body and example URL provided in the API Manager.
- Configure the payload parameters (Resource and Path Parameters, Path Order, Query Parameters and Request Body). We'll explain how to set each up in the following sections.
- Click the Update toolbar button. If the link wasn't already passing data, its line in the diagram will become dashed to indicate it now passes parameters between the tasks.

¶ Payload Parameters
¶ Resource and Path Parameters and Path Order
The Resource and Path Parameters field expects an object that defines the segments appended to the base URL, while the Path Order field specifies the sequence in which these segments appear.
For example, if the target API has the following setup:
- Example URL Route:
https://api.example.com/api/v1/users/1 - Base URL:
https://api.example.com/api/v1
You can reconstruct the Example URL Route with this link configuration:
- Resource and Path Parameters:
{
  "resource": "users",
  "resourceId": 1
}
- Path Order:
["resource", "resourceId"]
¶ Parameter Key Names
Using meaningful parameter key names is a best practice, but you can use any key names as long as you're consistent. For instance, the following configuration is equivalent to the previous example:
- Resource and Path Parameters:
{
  "partA": "users",
  "partB": 1
}
- Path Order:
["partA", "partB"]
¶ Build the URL with the Base URL and Resource and Path Parameters
Notice that the URL used in the request is the result of appending the resource and path parameters to the base URL, in the order you defined in the Path Order field. This means that you can generate the same URL using different distributions of the URL segments in the Base URL and the Resource and Path Parameters.
For example, here are two different ways to generate the URL: https://api.example.com/api/v1/users/1.
¶ Approach 1: Adapt the Base URL to suit your needs
In this example, the Base URL excludes the version (v1) because it might vary across API requests. This allows you to manage versioning directly in the link configuration.
-
Example URL Route:
https://api.example.com/api/v1/users/1 -
Base URL:
https://api.example.com/api -
Resource and Path Parameters:
{
  "version": "v1",
  "resource": "users",
  "resourceId": 1
}
- Path Order:
["version", "resource", "resourceId"]
¶ Approach 2: Let Path Order define the sequence
Here, the Resource and Path Parameters object uses a different key order, but the Path Order ensures the resulting URL remains the same. This highlights that Path Order, not the object's key order, dictates the sequence of appended segments.
-
Example URL Route:
https://api.example.com/api/v1/users/1 -
Base URL:
https://api.example.com/api/v1 -
Resource and Path Parameters:
{
  "resourceId": 1,
  "resource": "users"
}
- Path Order:
["resource", "resourceId"]
¶ Query Parameters
To include additional details in your request, the Query Parameters field expects an object where each key-value pair represents a query parameter appended to the URL after a question mark (?).
For example, to use this URL in a request: https://api.example.com/api/v1/search?query=chatbots&sortBy=date&order=asc, you can use the following settings:
-
Base URL:
https://api.example.com/api/v1 -
Resource and Path Parameters:
{
  "resource": "search"
}
- Path Order:
["resource"]
- Query Parameters:
{
  "query": "chatbots",
  "sortBy": "date",
  "order": "asc"
}
Unlike Resource and Path Parameters, the key names for Query Parameters are defined by the API and their order is not relevant.
¶ Request Body Parameters
If the target API accepts a request body and you have enabled passing parameters, the request body defined in the API manager or the cURL view will be overwritten by the value provided in this field.
¶ Inject Dynamic Values In The Payload
You can dynamically inject values from the response of the previously executed task by wrapping the value in the target payload with double curly braces.
For example, imagine a task to create a post in a forum application, configured with the following details:
- HTTP Method: POST
- Example URL Route:
https://forum.gwocu.com/api/v1/posts - Response Body:
{
  "id": "V1StGXR8_Z5jdHi6B-myT",
  "title": "A title",
  "content": "Some description"
}
Here, the id is not a fixed value; it is generated by the server for each request. To verify that the post was successfully registered, you might want to inject this id dynamically into the payload of the next API call.
Below we'll use hypothetical API definitions to demonstrate how to inject this value into the:
- Resource and Path Parameters
- Query Parameters
- Request Body
¶ Inject Resource and Path Parameters
o dynamically set the id in this endpoint: GET https://forum.gwocu.com/api/v1/posts/:id, use the following settings:
-
Base URL:
https://forum.gwocu.com/api/v1 -
Resource and Path Parameters:
{
  "resource": "posts",
  "resourceId": "{{id}}"
}
- Path Order:
["resource", "resourceId"]
¶ Inject Query Parameters
To dynamically set the id in this endpoint GET https://forum.gwocu.com/api/v1/posts/?id=:id, use the following settings:
-
Example URL Route:
https://forum.gwocu.com/api/v1/posts -
Query Parameters:
{
  "id": "{{id}}"
}
The Resource and Path Parameters configuration is omitted for simplicity.
¶ Inject Request Body Parameters
To dynamically set the id in this endpoint GET https://forum.gwocu.com/api/v1/posts, use the following settings:
-
Example URL Route:
https://forum.gwocu.com/api/v1/posts -
Request Body Parameters:
{
  "postId": "{{id}}"
}
The Resource and Path Parameters configuration is omitted for simplicity.
¶ Troubleshooting
While you can rename the resourceId key to any name of your choice, the value wrapped in double curly braces must match the parameter name returned by the previous API, in this case: id.
If the name inside the curly braces does not match any field in the response body, the system will search for it in the actions applied to the API, and if that also fails, will ultimately resort to use the name literally.
For example, using the following configuration:
- Resource and Path Parameters:
{
  "resource": "posts",
  "resourceId": "{{postId}}"
}
- Path Order:
["resource", "resourceId"]
Will yield this URL: https://forum.gwocu.com/api/v1/posts/%7B%7BpostId%7D%7D.
This happens because the double curly braces are URL-encoded when no matching value is found before making the request.
¶ Control Task Order of Execution
When multiple tasks are linked to the same source task, you can use the Sequence property of each link to define the execution order of the target API tasks. Links with higher sequence values will execute their target tasks later.

In this example, we compare two workflows that have the same tasks and structure, but the target tasks execute in reverse order due to the sequence values in their corresponding link configurations.
¶ Execute Single API Tasks
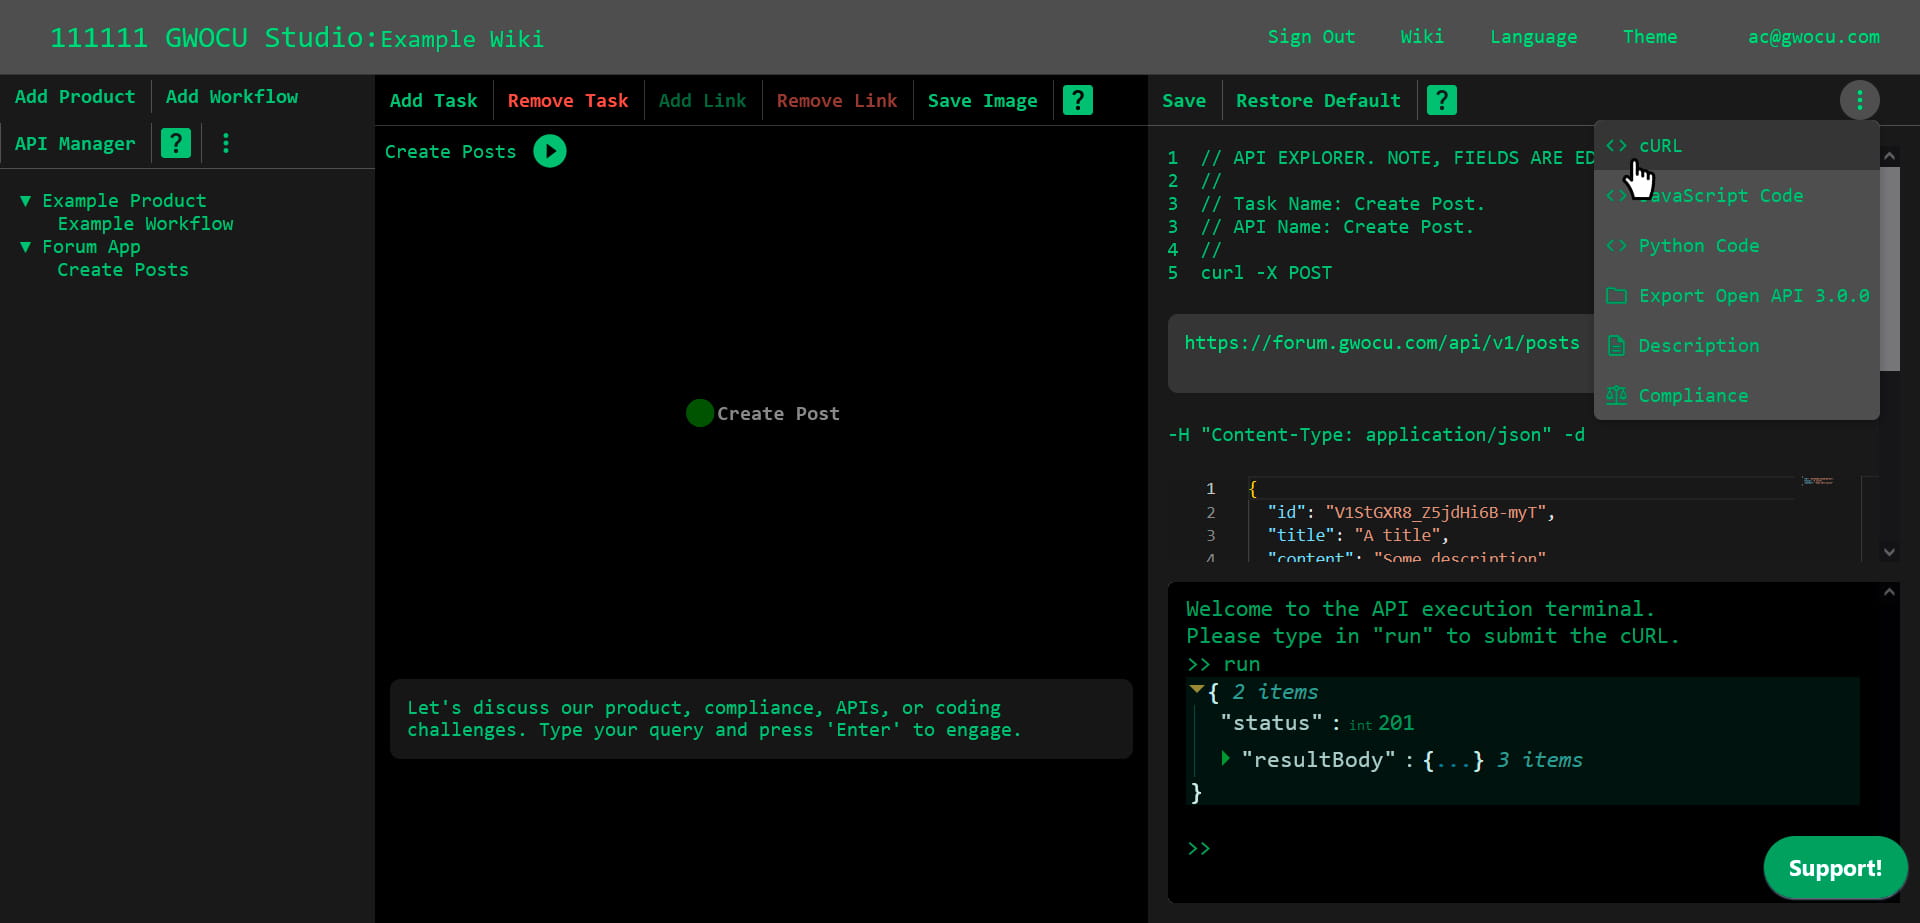
You can execute API tasks individually within a workflow using the cURL view in the right panel. Click on the corresponding task node in the workflow or select cURL from the right panel menu to open the view, then use the terminal interface at the bottom to make the request.
¶ Default Payload
- If the task does not receive parameters from a previous task, its URL and request body default to the configuration in the API Manager.
- If the task does receive parameters, the URL and request body will be determined by the link configuration.
¶ Edit Requests from the cURL View
You can edit the URL and request body before calling the API. These changes:
- Apply only to requests made while in this view.
- Do not persist across views or workflow executions.
If the task does not receive parameters from a previous task, you can save changes as a custom payload specific to this task by using the Save toolbar button.
Use the Restore Default toolbar button to revert any saved changes and restore the API's default configuration from the API Manager.
¶ Troubleshooting
A common issue is not being able to update the payload from this view. If your task receives parameters, the link configuration will overwrite the payload, so you must make changes in the Link View instead. If your task doesn't receive parameters, ensure that the JSON in your request body is valid, as syntax errors can prevent updates.
¶ Run Workflows
To execute a workflow, first make sure you have at least one API task connected to another task, as only linked tasks will run. Then, click the Run Workflow button next to the workflow name in the middle panel. The workflow terminal view will open in the right panel.
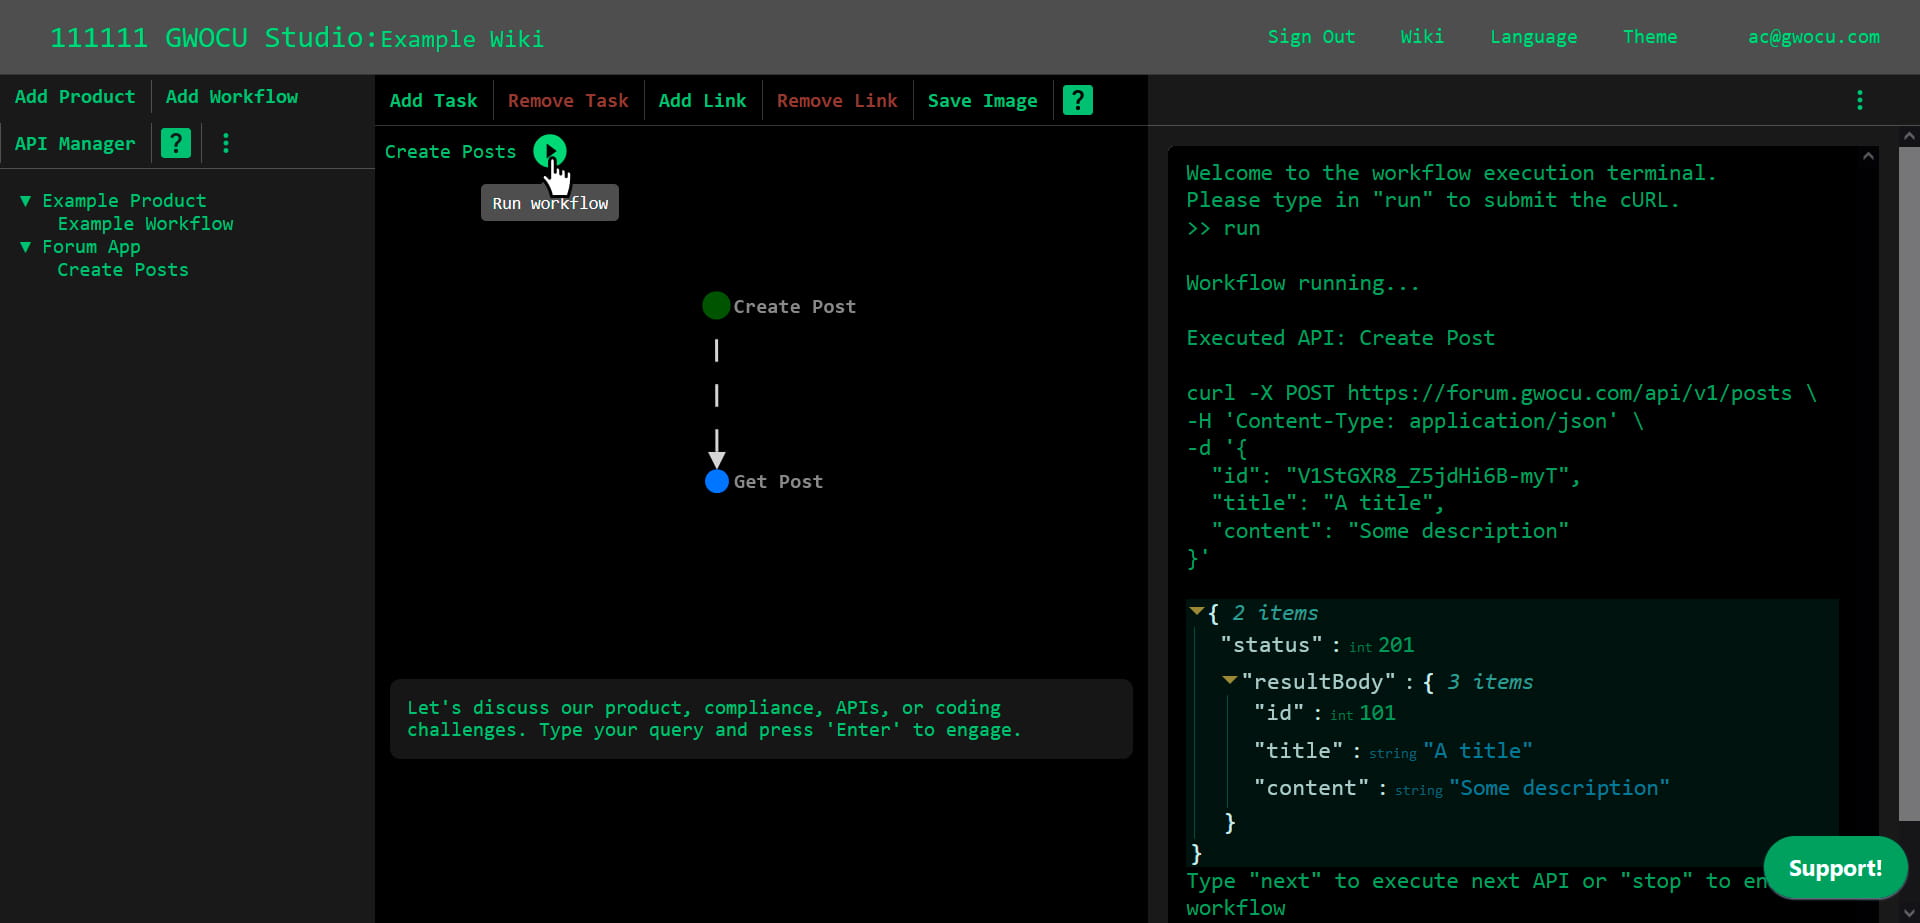
Use the following commands in the terminal to control execution:
- run: Starts or restarts the workflow by executing the first task.
- next: executes the next task in a workflow, but only after the workflow has started.
- stop: aborts the workflow execution once it has started.
- clear: clears the terminal interface.
The API response will be displayed as a JSON object containing both the status and the response body. You can hover over a parameter or its value to reveal the Copy to clipboard button.
¶ Webhooks
If your workflow relies on webhook notifications from an API, you can register a webhook listener to handle them. Then, create a task in your workflow to query our server and check for those notifications.
¶ Register a Webhook Listener
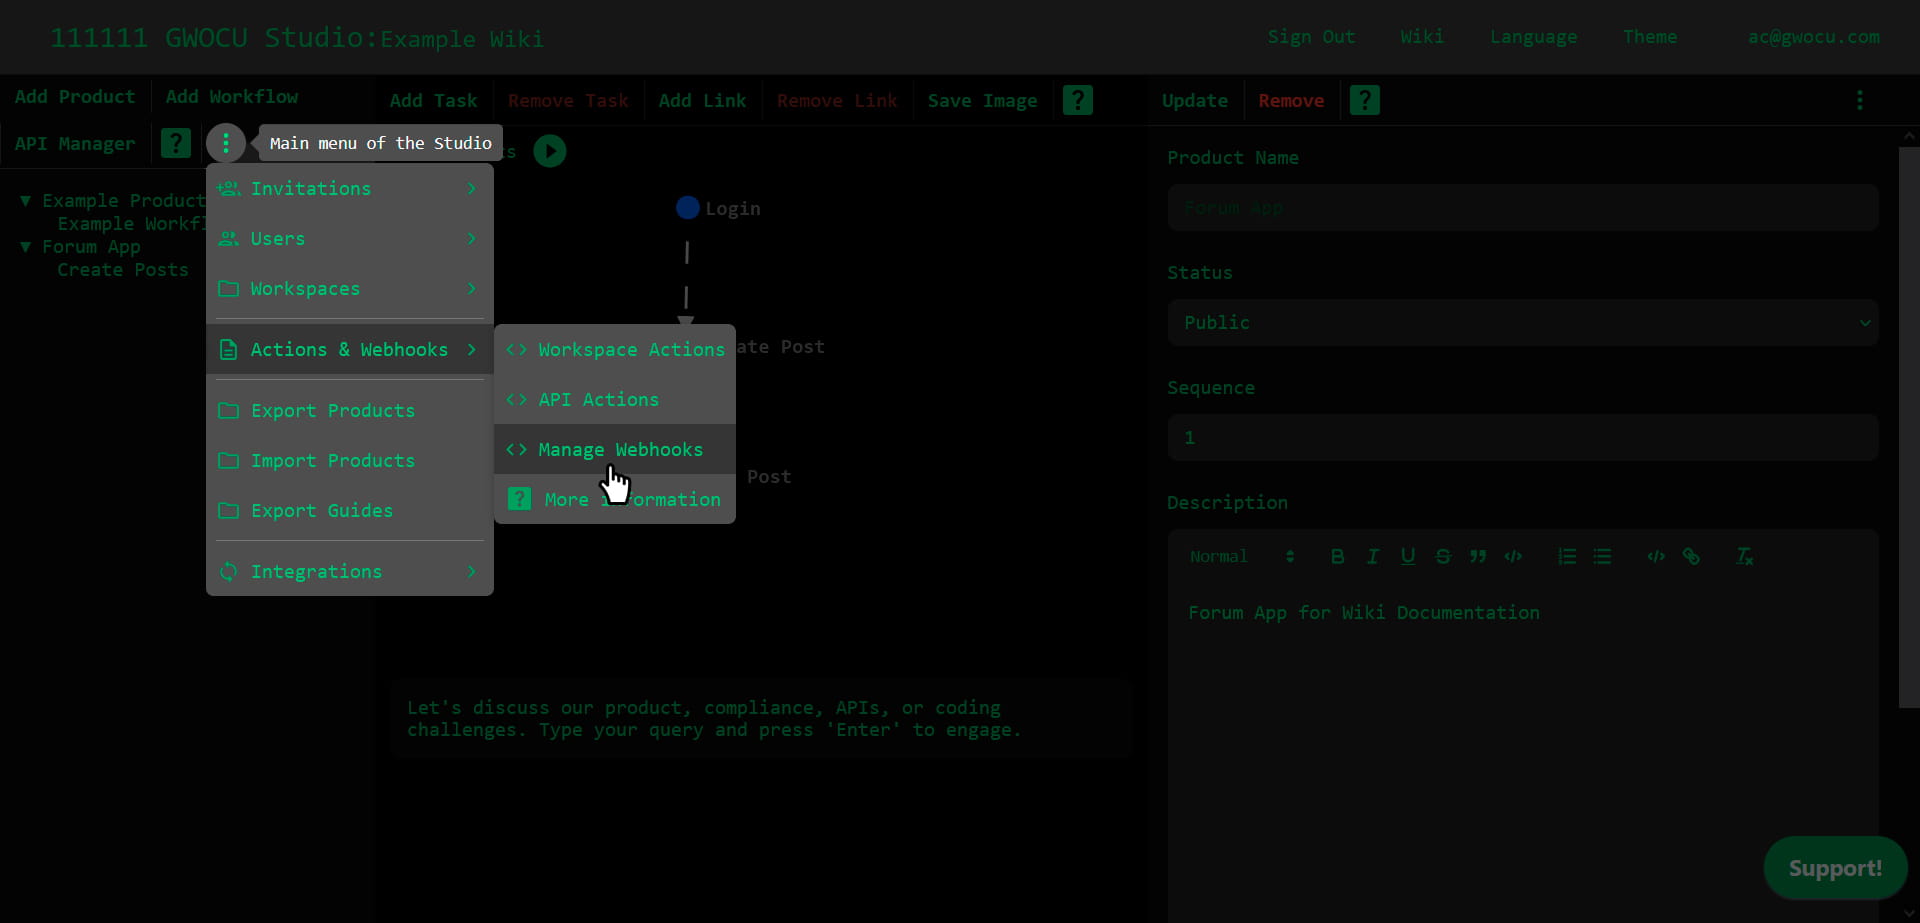
Follow these steps to create and set up a webhook listener that handles your webhook notifications:
-
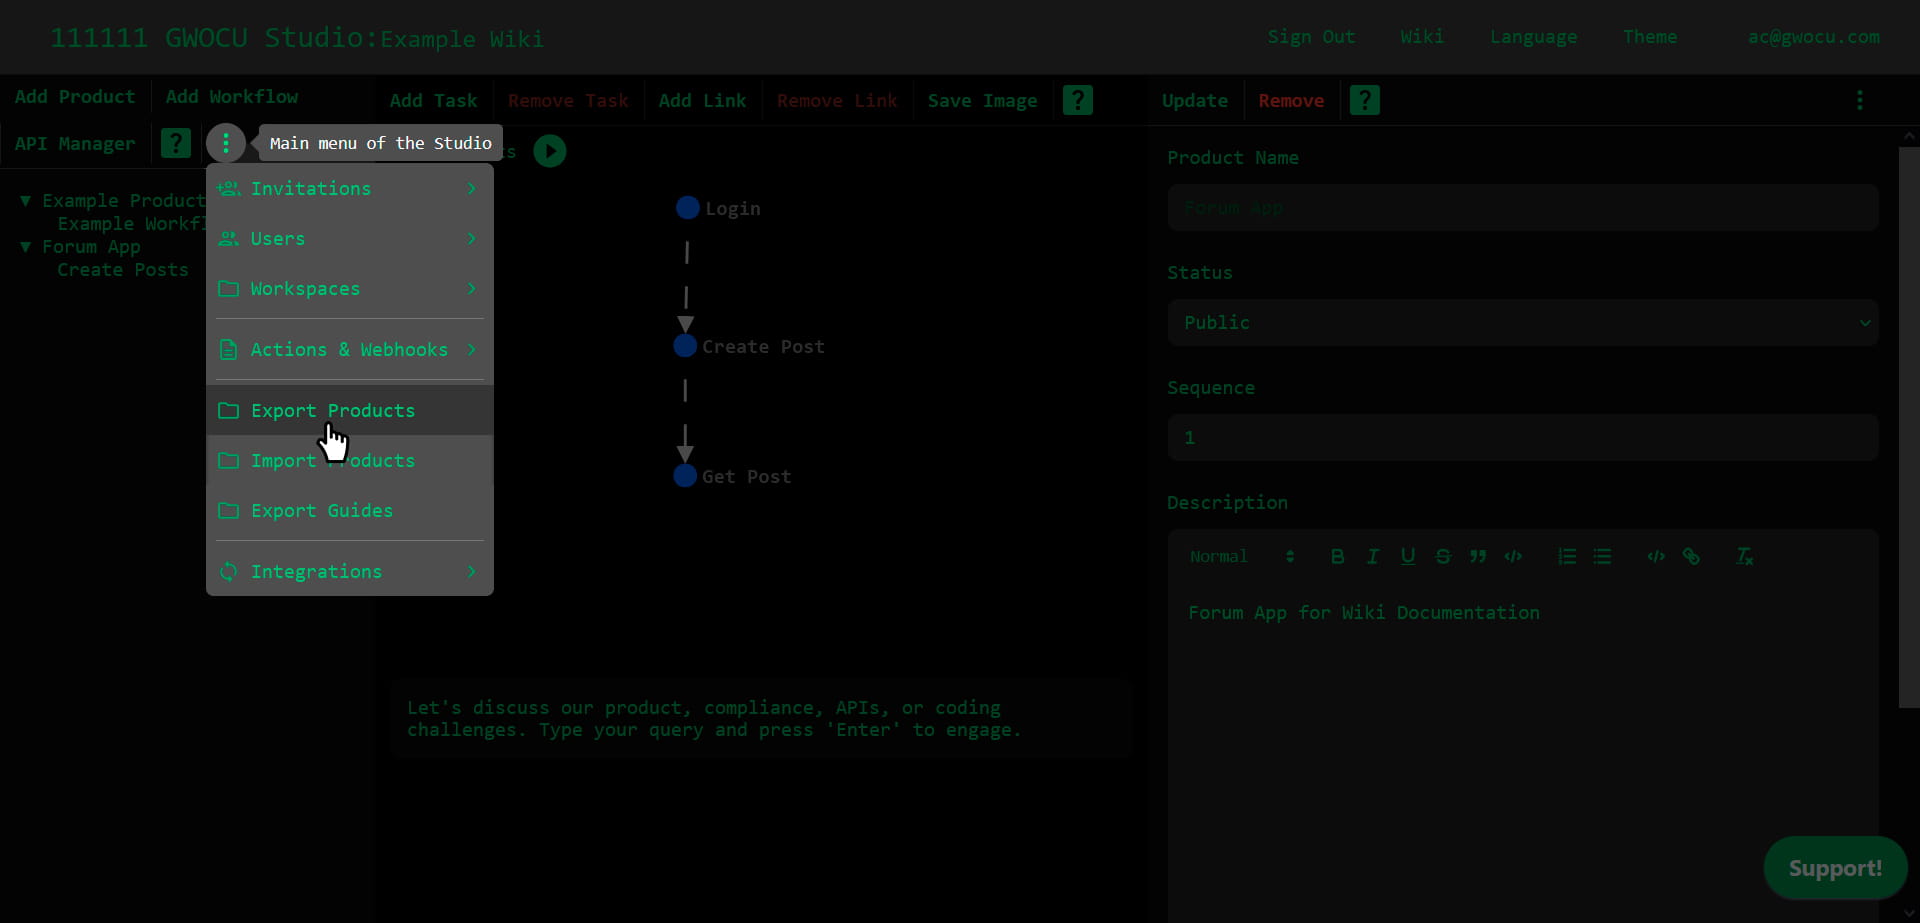
Open the main menu in the home page.
-
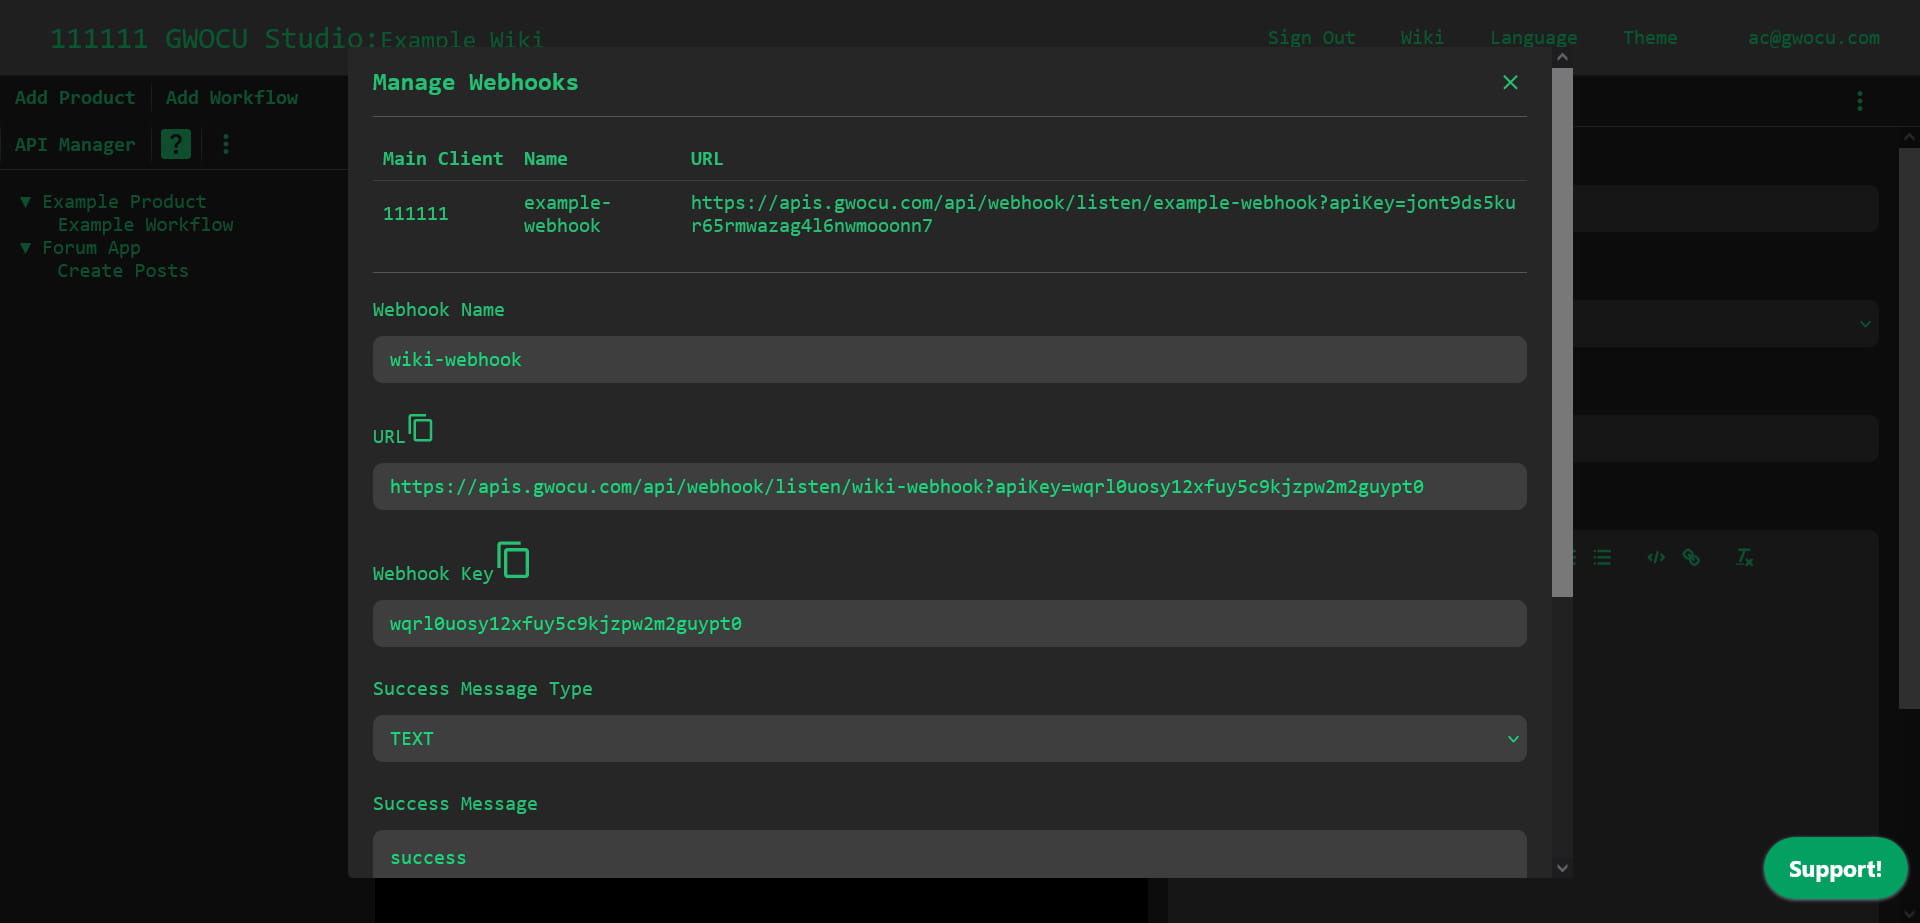
Go to Actions & Webhooks > Manage webhooks.
A modal like this will appear:
-
Fill out the form with the following details:
- Webhook Name: must be unique and include only safe characters (alphanumeric,
$-_.+!*'()), as it will be URL encoded. Can't be changed later. - URL: the endpoint URL for webhook notifications, automatically generated using the webhook name.
- Webhook Key: a secure key, also generated automatically from the webhook name.
- Success Message Type: choose from TEXT, JSON or HTML.
- Success Message: the message sent to the API to confirm the webhook notification was received.
- YAML: currently disabled. An action configuration to implement authentication if needed for incoming notifications.
Use the Copy to clipboard buttons next to the form labels to save the values for Webhook Name, URL, and Webhook Key, as they are required to configure APIs in your workflow.
- Click the Add Webhook button to create the webhook. A confirmation toast will appear, and the webhook's details will be added as the last row in the table.
¶ View or Edit Webhooks
Click on the webhook rows to view or edit their details or click again to unselect it. After making changes, click the Update button to save them.
¶ Listen for Webhooks in your Workflows
Use the generated webhook URL as the endpoint for the server awaiting notifications from your API.
¶ Check for Webhook Notifications in your Workflows
You can use a system API to check for webhook notifications by providing the webhook name and its key. To integrate it into your workflow:
- Create a task specifically to check for webhook notifications.
- Assign the "Check Webhook" API to the task. Edit any other details as needed, and save your changes.
- Open the cURL view for the task by clicking the task node or selecting cURL from the panel menu.
- Set up its request body:
{
  "name": "The-Webhook-name",
  "apiKey": "The-Webhook-Key",
  "reset": true
}
Where:
name: the webhook name used when registering the listener.apiKey: The webhook key generated during registration.reset: an optional boolean parameter. If set to:true: resets the listener after delivering the latest notification, so subsequent calls return no notification and a "pending" status.false: returns the most recent notification.resetis false by default.
This is an example of response body returned by the API:
{
  "status": 200,
  "resultBody": {
    "status": "received",
    "lastNotificationTimestamp": "2025-01-21T02:55:00.326Z",
    "responseStatus": "success",
    "notification": {
      "parameter": "value"
    }
  }
}
¶ Clone Workflows
To duplicate a workflow:
- Select the workflow by clicking its name in the tree panel on the left or its canvas in the middle panel of the home page.
- Click the Clone toolbar button in the right panel. A modal window like this will appear:
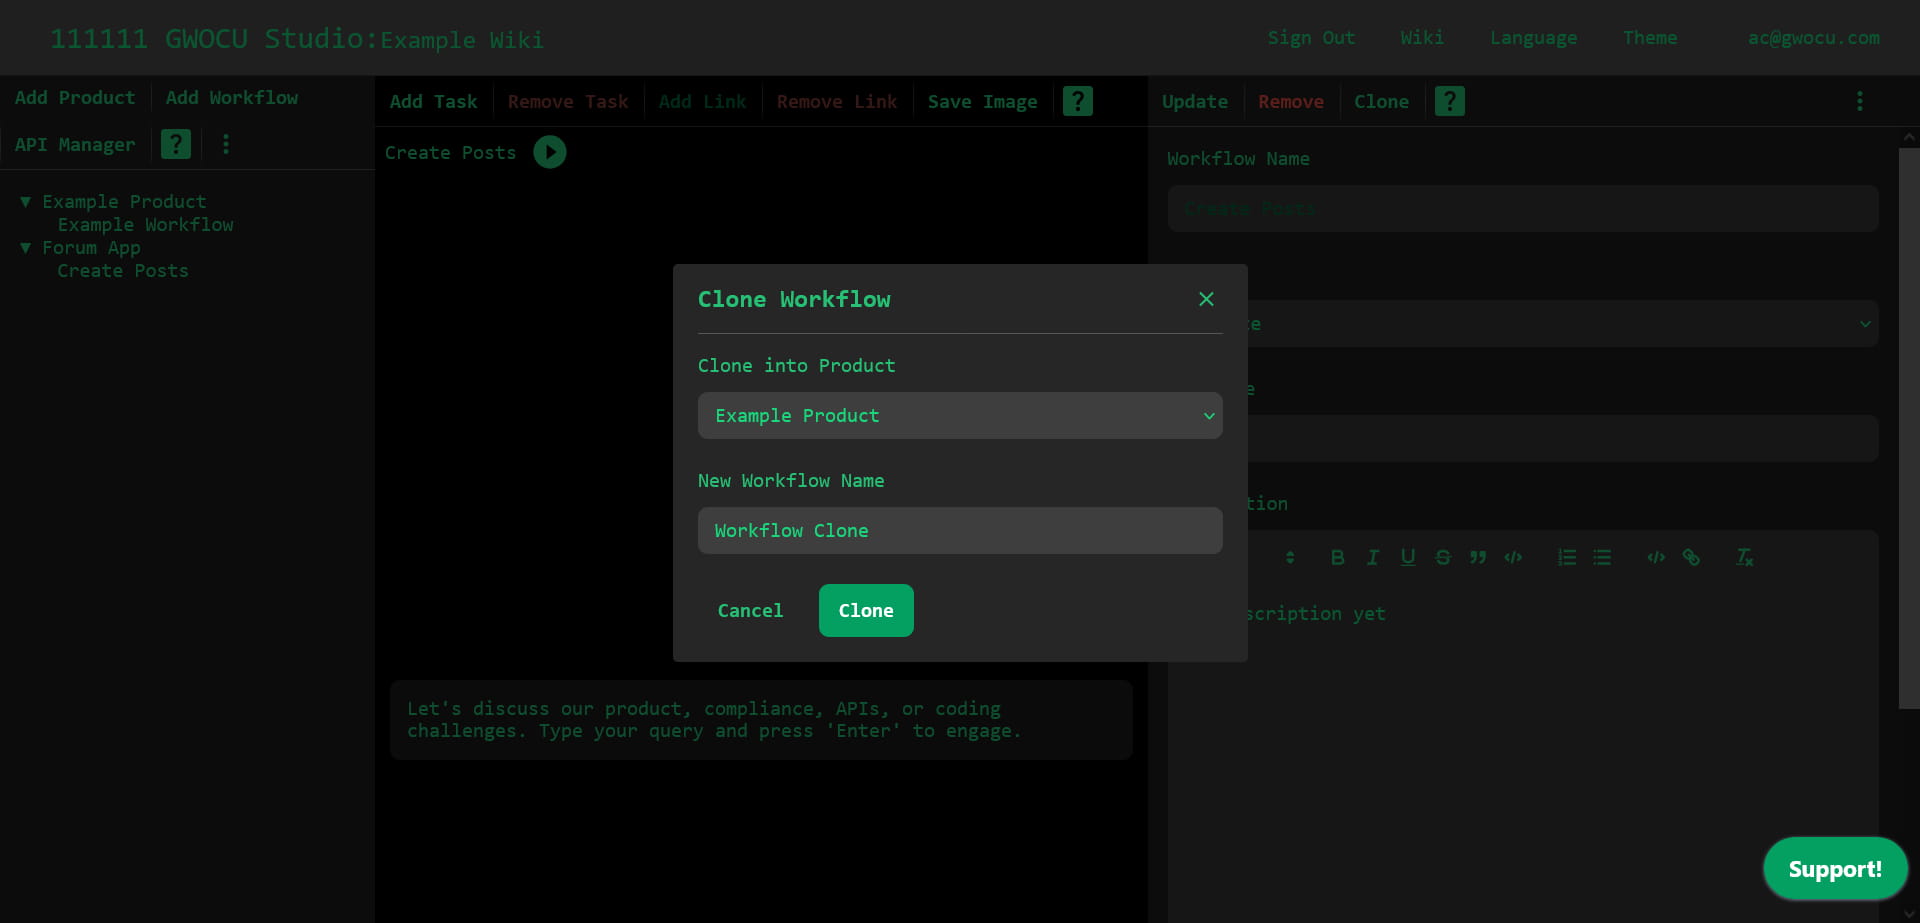
- Choose the product to which the cloned workflow will belong.
- Enter a unique name for the cloned workflow.
- Click the Clone button. An alert will confirm that the workflow has been created. Then the page will reload, and the new workflow's name will appear at the bottom of the selected destination product.
¶ Copying Workflows into Other Workspaces
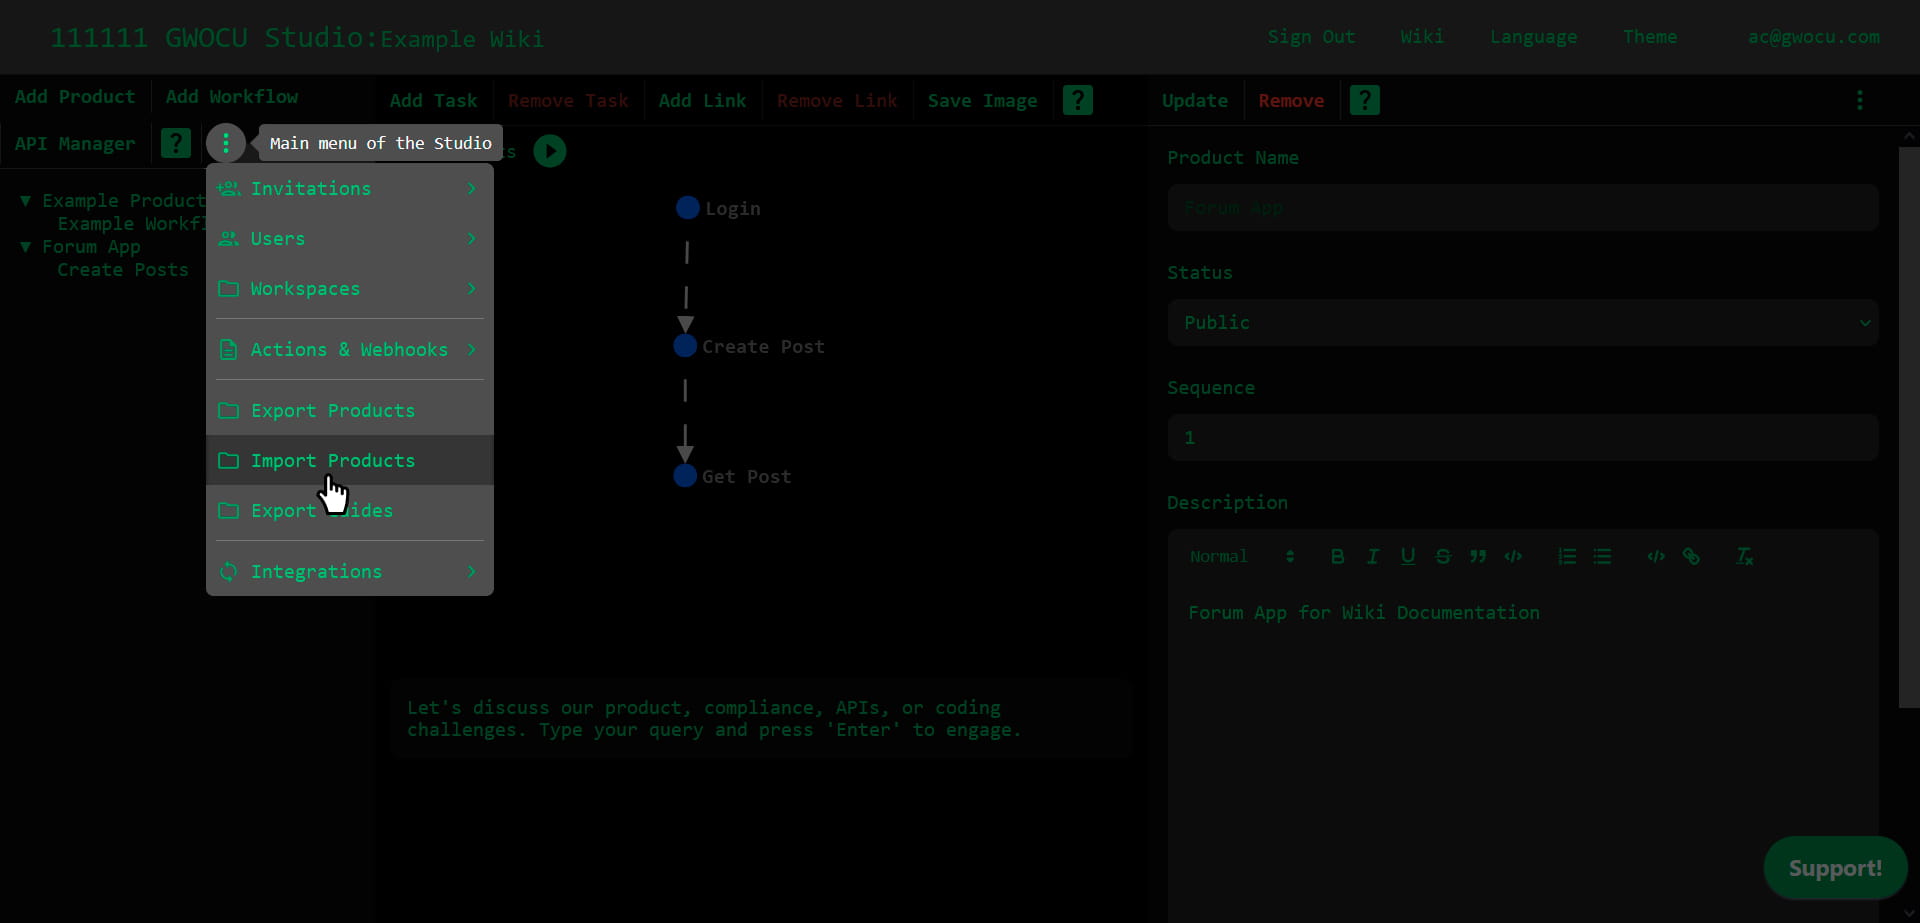
To copy a workflow between workspaces, you can export the product it belongs to and import it into another workspace.
¶ Export Products
-
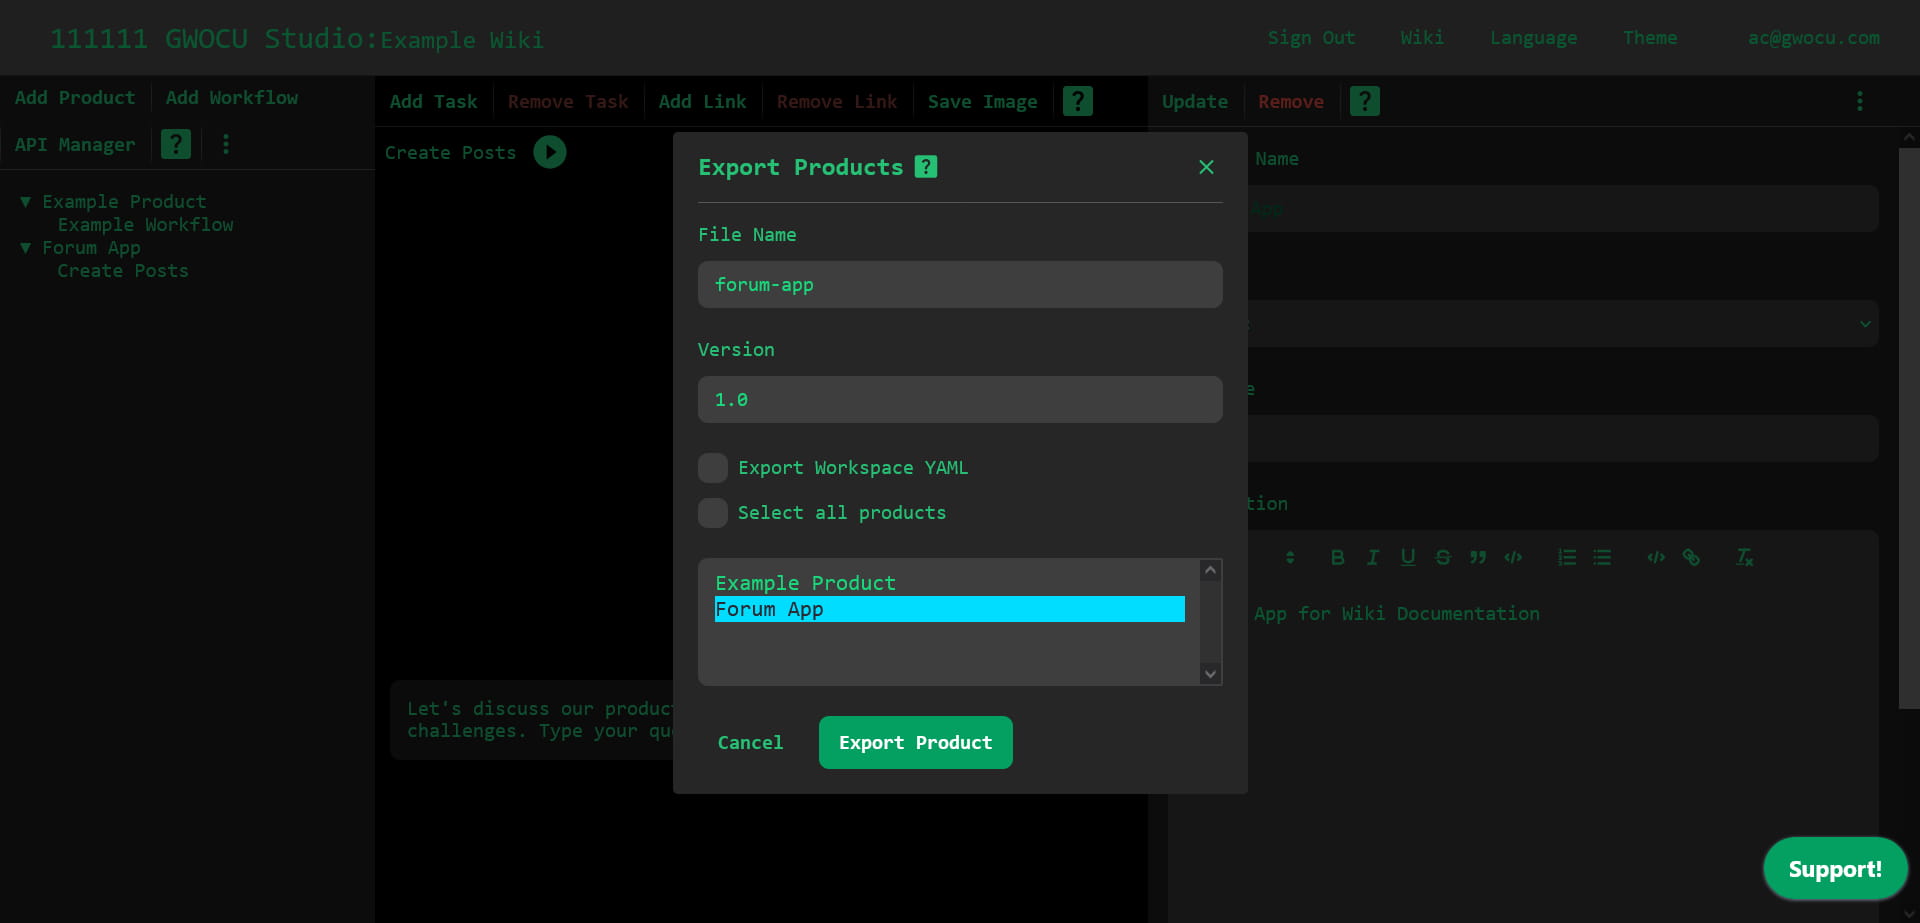
Open the main menu in the tree panel of the home page.
-
Select Export products.
A modal window like this will appear:
-
Set a File Name and Version. The final file name will combine these inputs as:
FileName-Version. -
Select the products you want to export:
- Check Export all products or choose below to export all available products.
- Hold
Shiftto select a range of products orCtrl(orCmdon Mac) to select multiple products individually.
- Click the Export products button. A YAML file containing the selected products and their workflows will be downloaded to your device.
¶ Import Products
Make sure you don't have products with the same name as the ones you want to import, because they will not be overwritten.
-
Open the main menu in the tree panel of the home page.
-
Select Import products.
A modal window like this will appear:

-
Click the Choose File button and select the YAML file containing the products.
-
Click the Import products button to start the upload. A progress bar will display the upload progress. Once the import is complete, an alert will confirm success. After an automatic page reload, the imported products will appear listed in the tree panel. The APIs associated with the imported products will also be visible in the API manager.
¶ Export Workflow Graph as Image
To export your workflow graph as an image:
- Select the workflow by clicking on its name in the tree panel on the left or clicking on its canvas in the middle panel of the home page.
- Click the Save image toolbar button in the middle panel.
- Enter your preferred output image format ("png" or "svg") in the prompt.
- Click Ok to confirm. The image will be downloaded to your device.
If you're an Owner or Designer, you can zoom in, zoom out, and pan the graph before exporting to make sure the desired layout is captured in the image.
¶ Change Workflow Visibility
By default, products and workflows are private, meaning that users with the Reader role—whether registered or accessing your workspace—cannot view or interact with them.
To make a workflow visible to readers, you must set the Status to public for both the workflow and the product that contains it. A product's public status does not automatically apply to its workflows, allowing you to control visibility at the workflow level. However, making a product private will hide all of its workflows from readers.
¶ Make a Product Public
- Select the product in the tree panel. Its description view will open in the right panel.
- Set the Status field to Public.
- Click the Update toolbar button.
¶ Make a Workflow Public
- Select the workflow in the tree panel or by clicking its canvas in the middle panel. Its description view will open in the right panel.
- Set the Status field to Public.
- Click the Update toolbar button.
¶ Generate Code Implementations
The Studio can automatically generate Python and JavaScript code for integrating workflows or individual API calls into your application's codebase. The generated code includes the same settings configured in the Studio.
¶ Generated Code for API Tasks
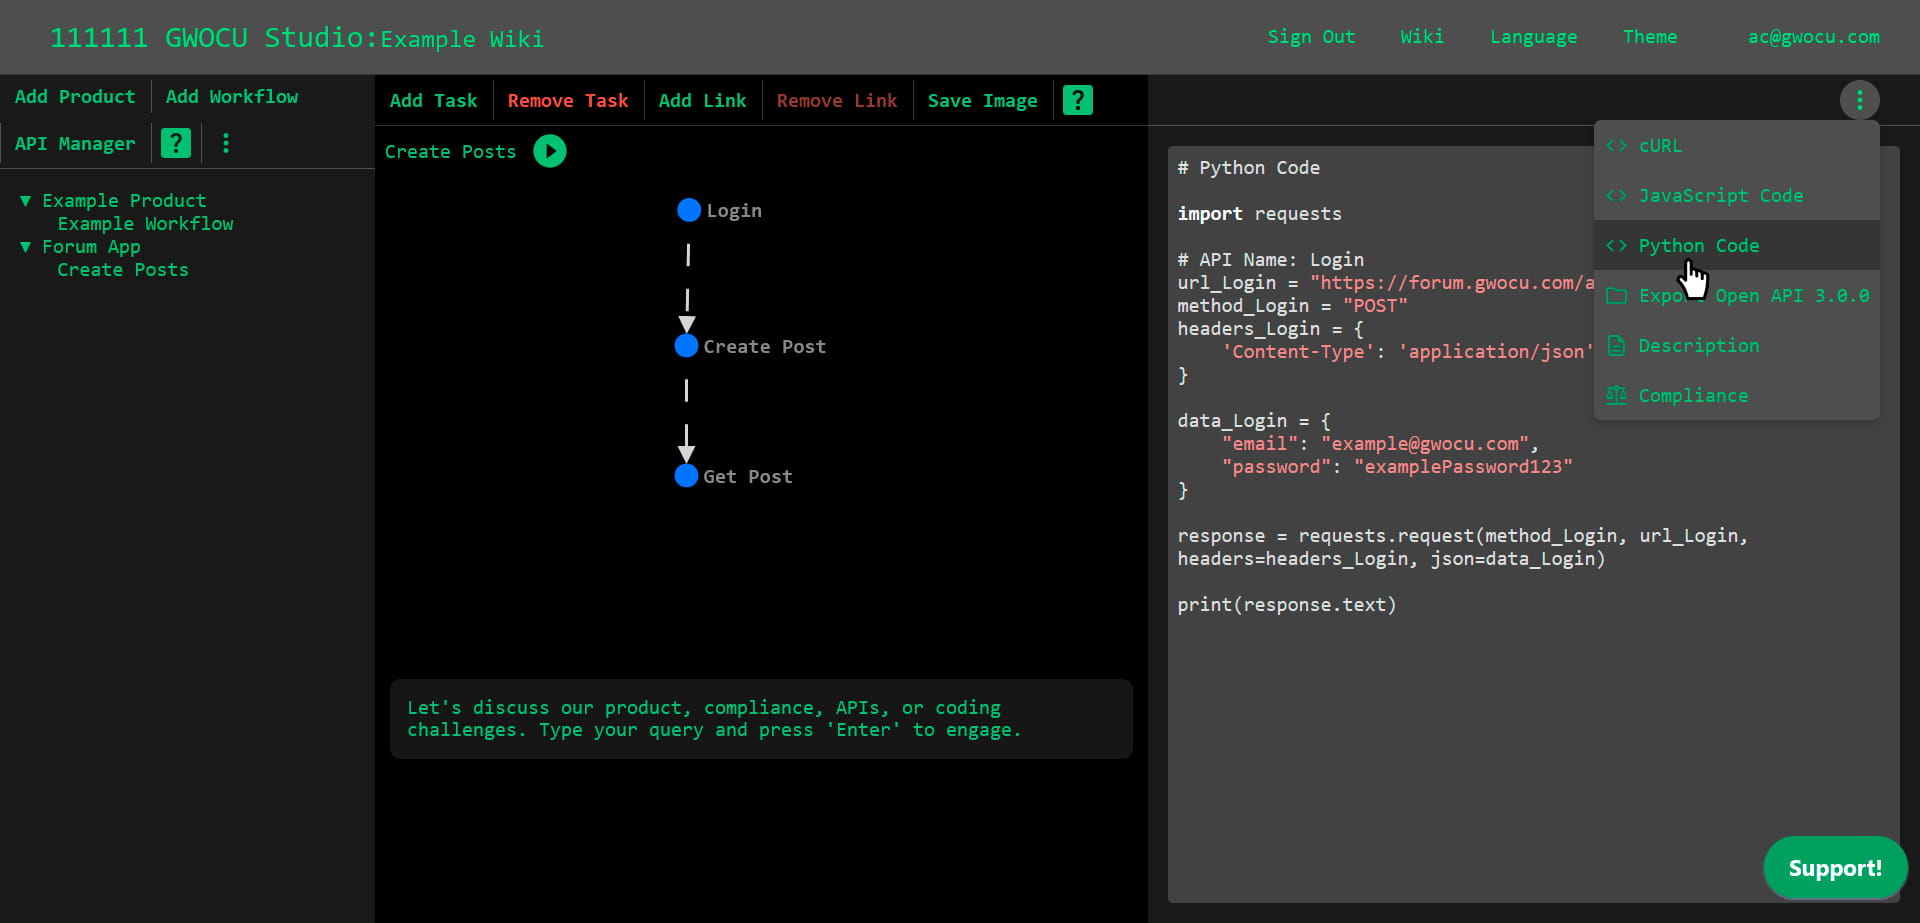
To view the generated code:
- Click on the node of an API task in the middle panel. The task details panel will open on the right panel.
- Open the details panel menu in the top right corner.
- Select JavaScript Code or Python Code, according to your preference. The corresponding code will appear in the panel, along with comments to introduce the API used.
¶ Generated Code for Workflows
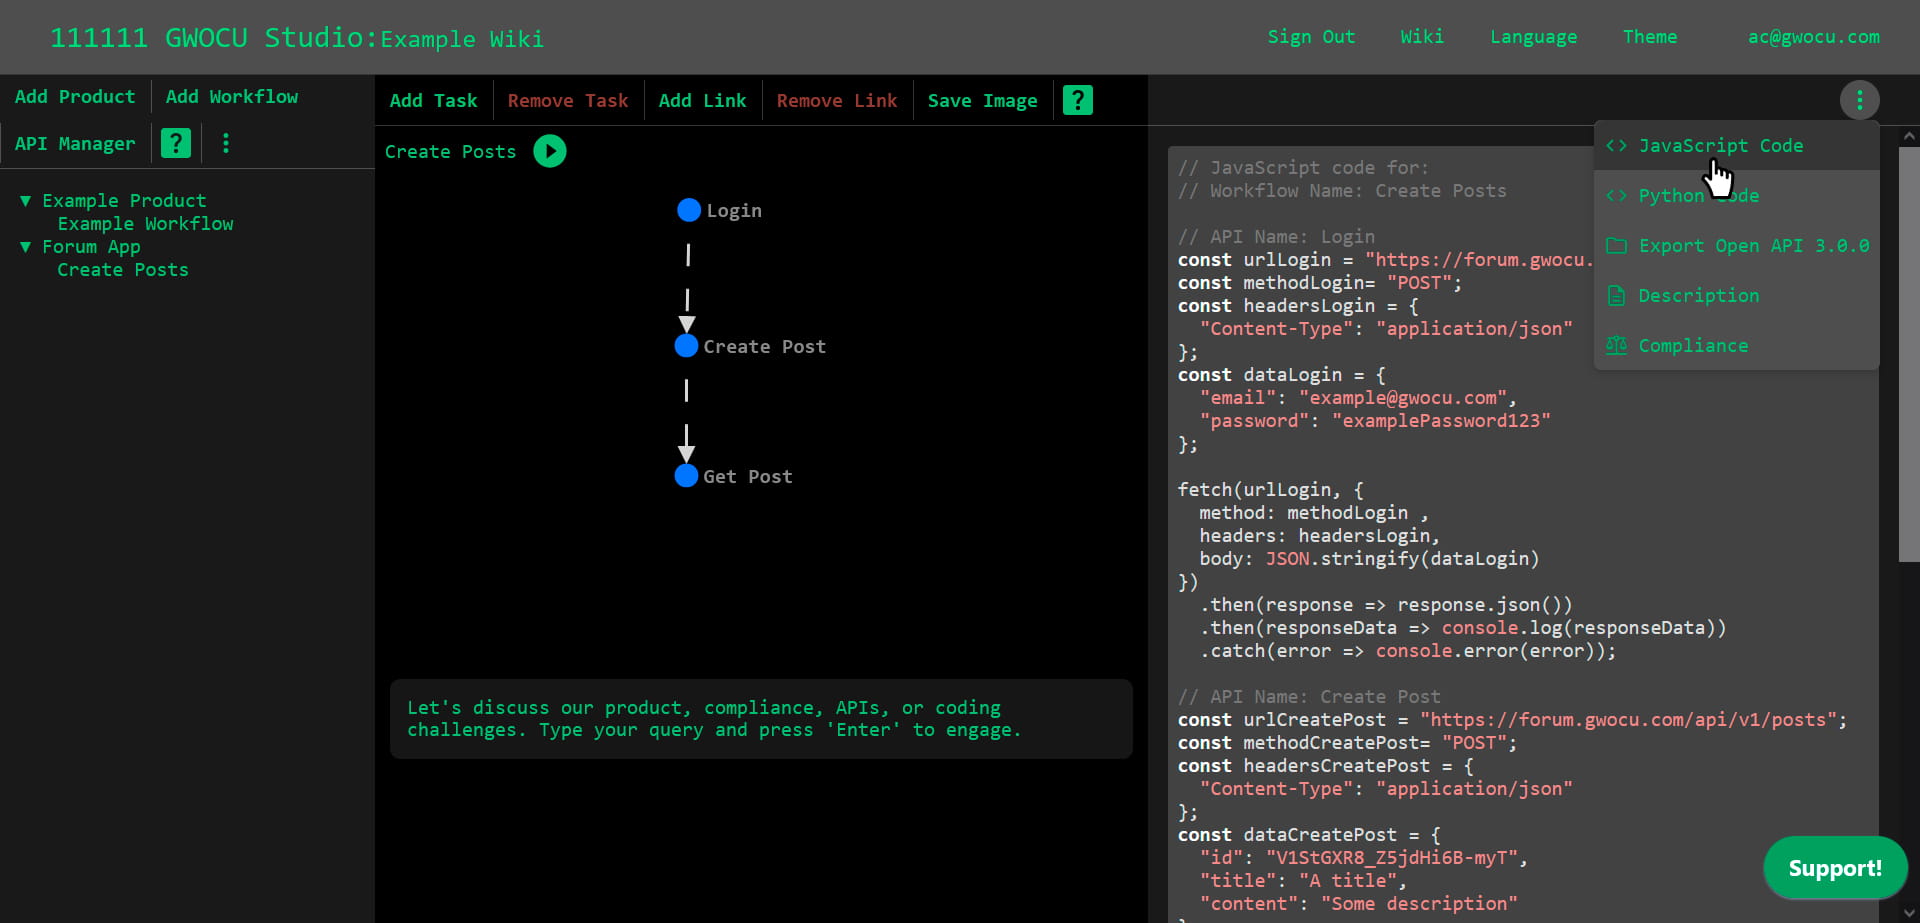
To view the generated code for an entire workflow:
- Select the workflow by clicking on its name in the tree panel on the left, or clicking on its canvas in the middle panel of the home page.
- Open the details panel menu on the top right corner.
- Select JavaScript Code or Python Code, according to your preference. The generated code will appear in the panel, along with comments to introduce the workflow as well as its APIs used.
¶ Removing Workflows
To permanently remove a workflow:
- Select the workflow by clicking its name in the tree panel on the left, or clicking on its canvas in the middle panel of the home page.
- Click the Remove toolbar button in the details view on the right panel. An alert will confirm the deletion. The page will then reload, and the workflow's name will no longer appear in the tree panel.